Micro Tom Micro Dwarf Tomato - Post Thumbnail

The Little Giant – Micro Tom Micro Dwarf Tomato + Time Lapse

Hi there, I’m Oscar, and today, I’m excited to introduce you to a tomato variety that grows even in the tiniest of spaces – the Micro Tom Micro Dwarf Tomato. In my latest YouTube time-lapse video, I’ve captured the growth journey of this miniature tomato variety, which is said to be one of the, if not THE smallest-growing in the world. With some handy tips and tricks, I’ve condensed weeks of growth into minutes of mesmerizing footage. I hope you enjoy! 😊 Join me on this horticultural adventure, and stay tuned for more insights into this captivating process. If you enjoy the content, don’t forget to subscribe to my newsletter, follow me on social media, and join the FateWorks Farms YouTube channel for your valued support!

Seeds & Germination

For this video, I chose to get my Micro Tom Micro Dwarf Tomato seeds from nurseryseeds over on Etsy. I had a great experience with these tomato seeds and they’ve got many other varieties to choose from as well. Go check them out!

Take a look. You’ll notice that despite belonging to a micro dwarf variety of tomato, these seeds closely resemble your general garden-variety tomato seed. They share the same size, with the familiar, waterdrop-shaped, pale profile and a pointy tip.

Micro Tom Micro Dwarf Tomato Seeds

Don’t sow the seed too deeply, but deep enough that it can remove its seed coat along the way; sow at no more than an inch deep, though I usually go for around 3/4 of an inch for tomato seeds. It’s important to keep the soil moist enough so that water can soften the seed coat, promote germination, and provide sustenance to a newly born seedling; if your soil is dry at the time of germination, your seedling won’t make it, or your seed might not germinate properly or at all. On the flip-side, do remember that waterlogging your soil can also make your soil anaerobic, rotting away your seeds before they get the chance at life; maintaining proper care over the moisture level of your soil is important all throughout your plant’s growth, but especially during germination. 

The seed sowed in this video came up by Day 9.

Soil & Container

I’m not really one to overcomplicate my soil-setup if I can help it, so I simply filled up my container with some of my left-over Kellogg’s Organic Potting Mix (pink bag) that I had from the last video and amended it with Espoma’s Garden Tone Instant and Slow Release Granular Fertilizer; I love this fertilizer and I use it in my setup because it brings my dead soil back to life, so that the beneficial microbes can work their magic and help feed my Micro Tom Micro Dwarf Tomato and whatever else I’ve got growing. You can always add other things to your soil, such as worm-castings, but I kept it simple this time around and just used that as part of the top-dressing later in the grow.

As a top layer to my amended and well-mixed soil, I added about an inch of Organic Coco Coir, acting as a clean, breathable, fluffy bed for my seed to germinate in and easily travel or grow out of; you don’t really have to do this, but I do feel like it increases the seed’s chances of germinating, and that’s important overall, mostly so that no time is being wasted waiting on something that won’t come up. You can use Coco Coir for many things from amending your soil, seed starting, to even making your own custom mix; it is made out of dehydrated coconut husks that are either shredded finely or left as long fibers or chips, and then compressed prior to shipping. Once you add water to the medium, it expands up to seven times its volume into a nice, soft, and fluffy organic material that will also decompose overtime and provide nutrition to your plants.

This Micro Tom was grown in a 5 gallon fabric container with a trash bag wrapped around it to prevent water from spilling all over my grow tent and for the soil’s water retention. I do enjoy using fabric containers, and they certainly have their place in the garden, but they might not be best suited for indoor growing unless you can find a way to prevent water leaking all over your grow space. For this grow, however, it worked out perfectly fine in the end and since I already had these containers on hand, I did not need to go out and get any other.

5 gallons for a micro dwarf variety of tomato is more than enough, and the Micro Tom in particular, is said to grow well in rather small containers. As seen in this image, I have three micro dwarf tomato varieties growing in a 5 gallon fabric container, each of them looking nice and healthy in their environment. None of these plants are the Micro Tom Micro Dwarf Tomato, but it shows you that there are other varieties that grow in a similar manner, such as the Orange Hat Micro Dwarf Tomato.

Even though the Micro Tom variety is often seen growing in a tiny container to demonstrate its window sill growing capabilities, I chose a larger container because I wanted it to grow stress-free so that I could observe its real growth potential, and I was not disappointed by it at all.

Watering & Fertilizing

Watering your tomato plants properly is important to their overall health and the quality of the fruits being produced, so if you were to pick a garden vegetable to be a bit careful with when watering, it’s tomatoes.

Water is life! It is the key ingredient used to carry out the chemical processes needed both in animal and plant cells. In nature and in the garden, it allows beneficial bacteria to stay alive and to keep your soil alive, helping to break down organic matter into nutrients which are then carried in solution to feed your plant(s). As such, underwatering your tomato plants can have drastic consequences to their health, leading to unfavorable vegetative growth, poor fruit growth & development, blossom end-rot, and even the plant’s complete demise. On the flip-side, overwatering your tomato plants also has its poor consequences; we’re talking about root rot from anaerobic soil, watered-down tasteless tomatoes, fruit splitting then rotting (especially after periods of underwatering), and the washing out of the nutrients from the soil, which can also lead to blossom end-rot and other issues.

Despite all of these things that COULD go wrong when watering your tomatoes, especially when growing outside with no control over rainfall, all we really need to do is not overwater and underwater, right? Easy peasy lemon squeezy…well, sometimes. When watering your containers, you can generally let the top of the soil dry up down to an inch, though you have to keep in mind how old your plant is and how deep its roots go; you can do “The Finger Test” to find out if you need to water or not. Just stick your finger about an inch into the soil and if you feel moisture, then don’t water. If moisture is lacking, you want to make sure that you water evenly and all the way. For containers, water until it drips out of the bottom so you know that the roots below will get access to it; if you’re using aerated fabric pots, doing this is important! Do remember that watering your tomatoes immediate to their harvest can result in a diluted flavor; I generally don’t water or fertilize at least 3 days prior to harvesting tomatoes, if the conditions allow.

For keeping up with the fertility of the soil during the grow and to keep it microbially alive, I like to give it a regular feeding of organic live liquid fertilizer (around the 5-5-5 NPK) as soon as I see the first true leaves on my plant and then continuing that every 1-2 weeks; I keep the concentrations relatively low for this regular feeding, especially if I choose to do it more often than a span of 2 weeks. It is good to keep in mind not to give anything too strong to a young plant, or it could suffer for it, and even then, a little goes a long way even when you are dealing with an adult plant. It is better to provide a slow and steady amount of fertility over time than to give it way more than it needs in one go. Aside from the regular feeding, because I like to keep that moderately light, I do go in every 3-4 weeks and decide if to re-amend the soil; if I choose to do so, I generally just give it an organic granular slow release fertilizer (around the 5-5-5 NPK) that includes beneficial bacteria, and if I have some, it might also receive some worm castings, all mixed with a handful of the same potting mix or coco coir if I want to. This is what I chose to do for this grow in general, giving it its first reamending upon seeing fruit formation to help it along, then just a liquid fertilizer post first harvest, as it did not need anything more to continue growing; I had amended the soil well prior to starting, and I wasn’t looking to overfertilize.

Having a regular feeding routine is generally a good idea, but I do want to advise to always step back from it for a second before throwing down any fertilizer; use the time to analyze if your plant really needs it, what it actually needs, and how much of what to give it. Slowly, you develop a sense of how much your soil is getting depleted for how often you fertilize, and this will give you insight into your own personal routine. This will be different based on your area due to weather and whatnot, so remember that gardening takes time and effort and it’s about making it work for you!

Lighting

Tomatoes are said to require 6-8+ hours of direct sun or light in order to produce fruit. This is generally true and most plants, especially fruiting ones, thrive in environments where ample lighting is available because of their need to photosynthesize; however, if you’re wanting to grow this variety and don’t get a lot of sunlight, do not feel discouraged. Surprisingly, these micro dwarf tomato varieties will set quite a decent amount of fruit even in poor lighting, so I would still give it a try if it’s not in complete shade with little bounce light all day.

Thankfully, I did not film this video outside; that would have introduced way too many other variables and would have made recording difficult. For these time lapse videos, I am currently using a Mars Hydro grow tent with an LED light as my filming station; I went over my setup in this post, in case you’re wanting to garden inside as well. Pre-germination, I had the LED light on for 24 hours so that my seedling would be met with a good amount of light as soon as it reached the surface; plants will stretch to find light, and will even weaken and become “leggy” in poor lighting conditions, so we want a good amount of it at first. I then followed an 18/6 light cycle post-germination, that is 18 hours of light and 6 hours of darkness, all the way until the end.

MARS HYDRO 2×2 Grow Tent Kit for New Grower TS600 LED Grow Light Full Spectrum Indoor Grow Kit 24″x24″x55″ Hydroponics Grow Tent 1680D Canvas with 4” Ventilation System

$299.99


Growth Habit, Pruning, Pest & Disease

As can be inferred by its name, the Micro Tom Micro Dwarf Tomato (Solanum lycopersicum L.) is a micro dwarf variety of tomato, growing in a bush-like manner and staying at a size small enough to grow inside on a moderately well-lit window sill!  It is technically considered a “Determinate” variety of tomato, which means it just gets to a determined height, sets its fruit, and generally dies off; however, many micro dwarf varieties, this one included, can keep producing for a while longer if pruned properly and is taken care of under the right conditions. How much longer? I did not keep going with this grow long enough to find out; it would be interesting to find out! Let me know in a comment below if you have any experience with this variety.

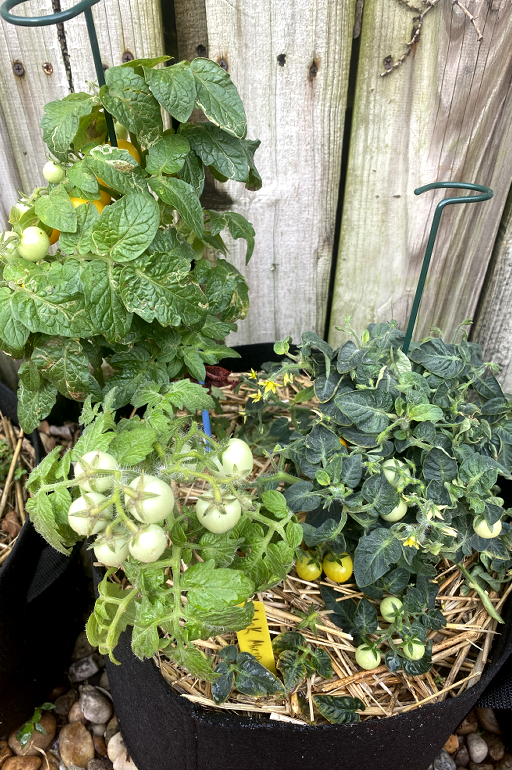
The Micro Tom is oftentimes shown growing in a tiny pot as a way to advertise its capabilities as a micro dwarf tomato and as such, I used to follow suit and grow it in the same way only to be disappointed by its growth and the taste & texture of the final fruit. I am grateful to one of my viewers on YouTube for asking me to film this variety, because having tried it before, I was just about ready to give up on it despite how popular it is amongst gardeners. For this grow, however, I chose to do things the usual time lapse way and used a 5 gallon container instead; I was extremely surprised at how much better this grew when given more root space and soil to grow in! This plant’s growth was MUCH improved from previous trials, this time getting to about 10 inches in height (YES I know! Tiny for a tomato plant! 😊) and 7.5 inches in diameter, and tasty fruit like I hadn’t grown before with this variety. 

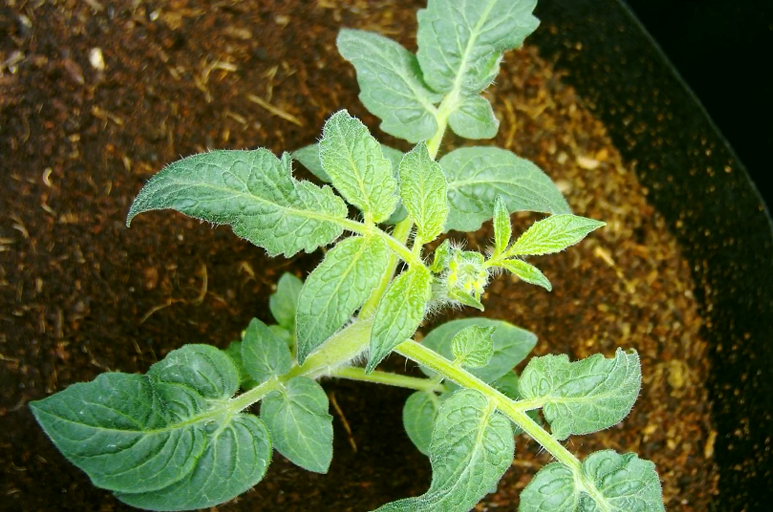
Just like many plants and other tomato varieties, the Micro Tom will grow and extend normally via its main stem and produce suckers between stem and leaf. Suckers will become new stems with more sun leaves, which will produce more suckers in between the two. It’s suckerception!

Flower structures develop at the tip of each stem as it grows, meaning that the more suckers and flowers you have, the more tomatoes you will get; this is especially true of determinate cherry tomatoes, so do NOT pick off the suckers unless you’re aiming to control the growth of your plant…which is totally unnecessary for this variety.

Removing suckers will mean less flowers, cutting into your yields.

This Micro Tom Tomato produced open flowers for me by Day 51 from seed and since I grew this plant indoors, I had to hand-pollinate them with an electric tooth brush as there is no wind or insects to shake them up for me.

You can see in this image that the leaves on this variety look quite interesting; they have a roundedness to them yet still pointy with little segmentation and lobing along the way. I would say that this qualifies it as a potato-leaf type of tomato instead of a regular leaf, though it looks somewhat of an in-between…if that’s a thing.

Although the foliage doesn’t grow as dense on the Micro Tom as I’ve seen with other micro dwarf tomato varieties, keeping up with pruning can still be an important step in your care for your tomato plant; we don’t need to get too crazy with it, but here are a few guidelines I follow for varieties like the Micro Tom Tomato.

Pruning Guidelines:

  • Prune off any old, diseased, dead or dying leaves; if they are fully brown or yellow in contrast with the rest of the plant, they are not photosynthesizing.
  • Do NOT remove young suckers.
  • Cut off any branch or part of a branch that is just done producing and growing. You can tell that a branch is done when it does not develop the next lead; just prune down to the previous sucker you see.
  • Cut off any flower structure that is fully done with its fruit.
  • Cut off any flower structure that you can tell didn’t get pollinated or won’t produce fruit.
  • If your plant is really old and drying up, harvest what it has and prune it all the way down, leaving just one or two green, fresh-looking suckers to become the next branch. You will have to determine if this is worth doing vs just starting another plant from seed.
  • Do NOT remove more than 2/3 of the plant’s total foliage unless it is diseased.

Remember that with careful pruning, you can keep this plant going longer!

Thankfully, since this was grown inside, I did not have to worry about any pests or disease for this grow; that’s not to say that it can’t happen, especially the tiny pests, but it is more unlikely to. Just to know, tomatoes in general are susceptible to blight although some are more resistant to it. Strong winds and rain carry blight spores through the air and with built up humidity, they land on your plant’s leaves where they can thrive; you’ll just see yellow sections on the leaves with brown centers where the tissue has died off. Blight CAN and WILL wipe out your entire crop if left unchecked, so be on top of pruning if you see it. There are many other things to watch out for such as leaf spot, tomato rust, leaf miners, whitefly, aphids, and even the dreaded tomato hornworms, but don’t let any of that stop you from throwing down a few seeds and getting your hands dirty in the garden; it is worth it!


Fruit & Taste

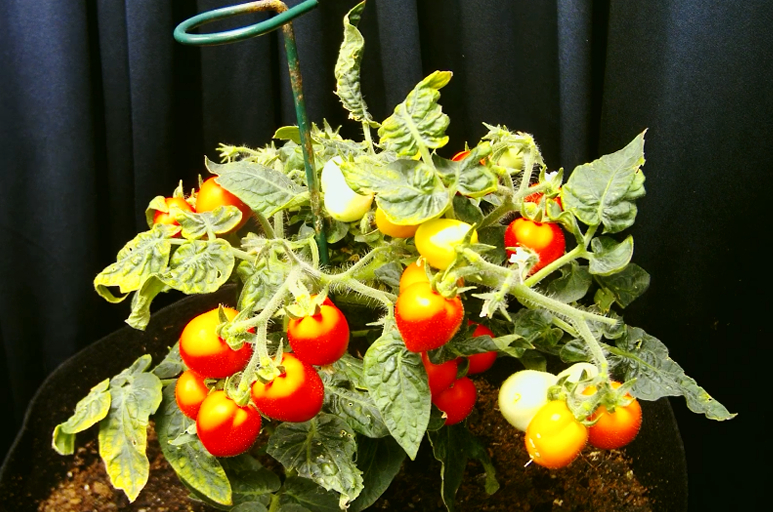
I love how stunning the Micro Tom Micro Dwarf Tomato variety is when growing and especially once it’s loaded up with ripe bright red fruit; it looks just like a little Christmas tree! For the looks of it alone, it is worth it, and you get to snack in the garden if you place these around in different spots as they only take up a tiny bit of space; outside, it might even make an interesting table centerpiece and topic for conversation with guests 😉. The tomatoes themselves were a tiny bunch, shaped like little red hearts, measuring anywhere from 0.5-0.7 inches in diameter.

In the video, I let them stay on the plant for a lot longer than needed because I wanted to get a good shot of it filled up with tomatoes, and they hold up surprisingly well. The skin on these tomatoes is a bit on the thicker side, so even if they crack a little, they stay together well enough to keep from spoiling. I only recorded two harvests for this grow, then transplanted this somewhere outside to endure the harsh weather and bugs; here’s the breakdown:

  • Harvest #1: 24 Tomatoes (83.5 g)
  • Harvest #2: 9 Tomatoes (32.4 g)

By Day 108, I was abundant with tiny tomatoes from SEED and once again, this moment is always an exciting one for me because there’s nothing like reaping the rewards of something you took care of or helped take care of, in whichever way it may come. For me, aside from plainly enjoying plants, it meant I got to share another awesome tomato variety, and it also meant that Rory and I got to taste it too! I will say, however, that I was a bit nervous about the latter of the three.

As mentioned before, I’ve actually grown the Micro Tom Tomato before, but always in poor conditions. As such, it is only to be expected that the quality of the fruit be poor, and indeed, nothing could get past the mealy and watered-down flavor from those previous attempts at growing this variety.

This time around, I gave the plant plenty of leg room and off it went to produce some of the most stunning little tomatoes I’ve seen. Looks are one thing though, but how did their taste compare?!

To say that I was surprised is an understatement. The texture and flavor were not what I was expecting at all. It was all great! The tomatoes were nice and juicy, the flavor was extremely rich with little to no sweetness and more on the acidic side; I was, without a doubt, eating a really delicious red garden tomato, albeit a tiny one. If you’re looking for a sweet micro dwarf cherry tomato, then this one isn’t for you, and that’s one reason I love trying and documenting different ones; even people who generally don’t like tomatoes might like a specific variety instead.

I filmed a full taste review with my dog Rory where we taste the Micro Tom Micro Dwarf Tomato for you. If you’re interested in watching that and reading more specifics about how this variety tastes, you can click >>here<< to look into that.

Overall, I thought that the fruit on this variety was really tasty. Even though the skin is a bit thicker, it’s not so tough that it doesn’t chew well with the rest of the tomato, so it’s a nonissue for me. The tomatoes also don’t have a lot of seeds, if you enjoy that; they’re just a big burst of flavor in a tiny fruit.

Do remember to save the seeds! Being an open-pollinated variety, the seeds should come true to type when harvested and replanted. I’ll remember to write a post and film a video on how to do this properly at some point, since tomato seeds should be fermented. Anyone can and should be able to collect and grow their favorite varieties right at home, and getting your hands on the Micro Tom to grow year after year, I think is always a plus.

Wrap-up

Basically, the Micro Tom Micro Dwarf Tomato is a delightful addition to any seed collector’s never-ending collection and to any garden, particularly for those with limited space. These little plants do well in small containers and can even be harmoniously interplanted among your existing crops or larger tomato varieties for picking as you go; as a tip, don’t restrict their root space too much and you’ll have yourself some tasty tomatoes. Beyond their aesthetic charm that adds a delicious touch to your garden décor, these tiny plants are decently productive, offering a good supply of richly flavorful and nutritious delights for you and your loved ones to snack on. Embrace the beauty of compact gardening and savor the taste of homegrown goodness with the Micro Tom Tomato – a small tomato plant that yields big satisfaction!

I have created a page where I keep track of the tomato varieties I have tried on my website and on YouTube plus the rest of social media. Check it out!

 >> My Favorite Tomato Varieties <<

Thank you so much for being here in this moment! Remember to like, share, and subscribe to our content and social media for your amazing support; I would love to see more people give home gardening and the Micro Tom a grow.

Well, I’ll see you in the next one!

No Comments

Leave a Reply

HomeShopWishlistAccount
Search
error: Protected