This Tiny Tomato Plant Is SO Productive! Orange Hat Micro Dwarf Tomato + Time Lapse

Hi everybody, Oscar here. Today I want to introduce to you this micro dwarf variety of tomato that anyone can grow even if you only have a window-sill of space and a small container, the Orange Hat Micro Dwarf Tomato. I’ve recorded this as a time-lapse up on YouTube with a few tips along the way; if a picture’s worth a thousand words, then a video is worth a gagillion, so I hope you enjoy! Do read on further for more detailed information on what I’ve done throughout the video and if you enjoy my content, make sure you subscribe to my newsletter, social media, and to the FateWorks Farms YouTube channel for your much appreciated support!

Seeds & Germination

For this video, I chose to get my Orange Hat Micro Dwarf Tomato seeds from Baker Creek Heirloom Seeds over at rareseeds.comAside from the Orange Hat Tomato, they offer a wide variety of seeds that I will most likely be making videos of in the future, so stick around for that!

As you can see, the seeds look much like a typical tomato seed with very much the same size and waterdrop-like shape, rounded with a pointy tip and pale in color; I don’t think I would be able to tell the difference between these and say, a grocery store beefsteak tomato’s if you had them mixed in a pile.

Orange Hat Micro Dwarf Tomato Seeds

I went with Baker Creek Heirloom Seeds not only because I couldn’t source them anywhere else at the time (I also like to support other sites, a few Etsy shops here and there, and some others), but also, having good quality seeds is one of the most vital points to your success in the garden; if gardening is more than just a hobby and feeding your family through your own self-sufficiency is your goal or your main source of profit, then this is especially important.

Now, I would love to rant about how crucial it is that you get good quality seeds whenever possible, but perhaps I’ll save that for a later post; this is more important in a commercial setting than for a hobby gardener anyways, but either way, I thought I’d at least mention it since no one wants to pay for something that doesn’t work, right? 

For the moment and as you can tell from watching, by the looks and yields alone on this tiny plant, there is nothing to be disappointed about; I can get to how these tomatoes taste further down below, so keep on reading!

The single seed I planted for this run germinated on Day 10-11; I was a little impatient because I had sown this same variety to plant outside and that one had germinated by Day 3. I thought something must have happened to it and I was literally about to pull it out and restart filming on the day I noticed it pop up…This one got lucky and survived my impulse, but that’s gardening! You have no choice but to learn a little patience as you go. 

The only thing I really made sure to do after sowing was to watch that the soil didn’t dry up. If your soil is dry as your seed tries to germinate, it cannot survive.

Soil & Container

My soil setup for this grow was far from perfect, let me explain. As far as I can tell, the experience of gardening has led me to use anything and everything to accomplish whatever I need in the garden, that means getting crafty and working with what I’ve got. Gardening can be expensive if you let it, however, if it is something you love and are passionate about, you can make it work for you with what you have available; you’ll be surprised with what you can accomplish.

I had no potting soil for this grow and all I had of substance was some leftover garden soil; this isn’t the worst thing in the world to use, but using soil that is not meant for a pot can lead to further issues during the growing phases of your plants…something I can get into in another post. Regardless, that is what I had.

Also, I had been experimenting at the time with using different types of soil mediums for seed-starting, and came across a great deal on Amazon for a two-pack of organic coconut coir bricks, so I had a little chunk of one available from the ones I was using to start the garden outside. These are it below:

Burpee Organic Coconut Coir Concentrated Seed Starting Mix, 16 Quart

$12.99


For those of you that aren’t familiar, coco coir bricks are made out of dehydrated coconut husks that are either shredded finely or left as long fibers or chips, and then compressed prior to shipping. Compressing them makes the shipping more affordable, and once you add water to the medium, it expands up to seven times its volume…dass a lot!

I ended up creating my own custom potting soil by mixing my leftover garden soil with some of the expanded coco coir as this would help to loosen up my mix and add a bit of aeration; I did not measure the quantities, but I would say that it was about a 70/30 ratio of garden soil to coco coir. To this, I added a few handfuls of one of my favorite granular fertilizers so far, Dr. Earth Organic Home Grown Tomato Vegetable and Herb Dry Fertilizer (4-6-3).

Dr. Earth Organic 5 Tomato, Vegetable & Herb Fertilizer Poly Bag

$17.99


After mixing well, I created a small pocket in the center of my container and then topped it off with just plain coco coir, filling the pocket and then adding about an inch over the entire mix. The pocket and one inch layer is so that my seed has the best “home” or environment for the best chance possible of germinating and taking off; this isn’t necessary, but seedlings don’t need any nutrition towards the beginning of their life because the seed itself contains enough energy to guide it up to its first true leaves. Therefore, I would much prefer the seed germinate in as sterile and neutral of an environment as possible and then it will work to find water and the nutrients below on its own. 

While soil is extremely important to the well-being of your plants, the size and type of container in which you put them in also has an impact on their development. Now, these time-lapse videos are mainly made for educational purposes, both yours and mine; they’re meant to keep a record of different varieties of plants, primarily focusing on the ones your can eat, enjoy, or utilize in medicinal and miscellaneous ways; therefore, for most of these videos, I will be keeping a standard of a 5 gallon container unless stated otherwise. This will let me know whether whatever I’m growing could use more space or maybe save on it by how the root system fills out the container. It will also give me an idea of how it affects growth & yield, how far I can push a particular plant variety, and most of all, my camera and tripod only have a limited amount of space in the grow tent I’m using!

Having tried ceramic, plastic, and fabric containers, I can honestly say that I prefer the fabric ones, especially if you’re on top of taking care of your garden regularly or have drip irrigation; that’s not to say that the other containers don’t have their place, because they do, but I was going to baby this plant throughout its life and the benefits of using fabric pots largely outweigh the cons. A 5-gallon fabric container is what I used. You can shop around and find these on eBay or Amazon, but here’s an example of what I’m talking about. Just make sure that whatever you get has handles! It will make your life so much easier if you find yourself moving your plants in and out of the house or around your garden, finding the perfect spot that works for them.

VIVOSUN 5-Pack 5 Gallon Grow Bags Heavy Duty 300G Thickened Nonwoven Plant Fabric Pots with Handles

$16.99


Watering & Fertilizing

From watching some of my favorite gardening YouTubers and to actually testing and doing it myself, I’ve noticed that watering tomatoes in particular is somewhat of an art. Now, I’m not going to elaborate too much on this at the moment because you can follow some general guidelines to watering and be successful with your entire garden, but do note that the way you water your tomatoes will affect the flavor.

Post-germination, I followed a standard of watering in the mornings every 1-2 days or as needed. Sometimes it would get a bit hot in the room and if I hadn’t watered deeply enough, I would have to follow up later in the day, especially as the Orange Hat Micro Dwarf Tomato plant matured. 

When you water your containers, you can generally let the top of the soil dry up down to an inch, though you have to keep in mind how old your plant is and how deep its roots go; you can do “The Finger Test” to find out if you need to water or not! Just stick your finger about an inch into the soil and if you feel moisture, then you don’t need to water. If moisture is lacking, you want to make sure that you water all the way until it drips out of the bottom of your container so your roots below also get access to it; if you’re using aerated fabric pots, doing this is important. 

For this video, I did water as deeply as I could, though admittedly I bent the “rules” a little bit; my setup was a bit lacking in thought and preparation as this was the very first video I’ve ever shot in this manner and on the topic of plants. Basically, I didn’t have anything underneath the container to keep the water from spilling all over my backdrop…so yes, I actually avoided watering until seeing it drip out of the bottom. Like I mentioned, I was babying this plant the entire time with water and fertilizer so this wasn’t that big of a deal, but the main drawback to this is that if water is not present in an area of the medium, the nutrients aren’t put into an aqueous solution for your plant’s roots to uptake; most chemistry is water-based.

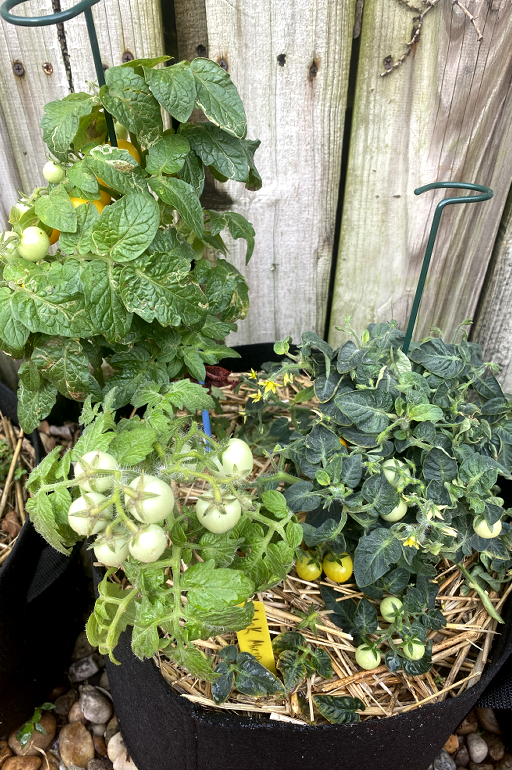
I do want to mention something really quick that was not seen in the video, because it pertains to both watering and fertilizing, and that is MULCHING. If I was to grow this outside, I would have put a layer of mulch over the top of my soil, as you’ll see in the Growth Habit, Pruning, Pest & Disease section below; this has many more benefits that I won’t go into here, but just keep in mind that mulching helps prevent water evaporation and the right type of mulch will break down and feed your soil over time!

Just like watering, I made fertilizing into a routine I would stick to. I had been looking for an organic water soluble fertilizer that I could use in my garden and on this grow, but found myself overwhelmed by the vast variety of them and just did not know which one to choose; I was also not looking to spend a ridiculous amount of money on it and since I hadn’t tried any of the ones available, I just had to do my research, read some reviews, keep an open mind, and just give it a try! For this grow, I chose to use this AgroThrive fertilizer below right from the beginning (after its first true leaves):

AgroThrive Fruit and Flower Organic Liquid Fertilizer – 3-3-5 NPK (ATFF1128) (1 Gal) for Fruits, Flowers, Vegetables, Greenhouses and Herbs

$31.97


It is generally suggested that in the vegetative stage of your plant’s development, it should receive more of a Nitrogen rich fertilizer to help with foliar growth and then switched over to something with more Potassium for fruiting. AgroThrive does have a different product that is similar to the one I used with NPK ratios better suited for foliar growth, but I just could not afford to get both and decided to go with what I had. Gardening does not have to be perfect for you to see success. 

I will be trying their other product at a later time, but this stuff really goes a long way; it has a 3-3-5 NPK ratio and all I did with it in the video was use it every 7-10 days by dividing the recommended concentration by 4 towards the beginning and then increasing it up to the recommended dose as the plant aged. I will add that I was way less careful with measuring with an older plant; this stuff is organic, but anything in high concentrations can be detrimental if used incorrectly, so keep that in mind as you fertilize.

Earlier, I covered that I used Dr. Earth Organic Home Grown Tomato Vegetable and Herb Dry Fertilizer (4-6-3) to amend my soil at the beginning of the grow; well, halfway through the plant’s growth, I brewed a tea according to the instructions on the packet and also added a bit of AgroThrive’s fertilizer to it. I mixed all of this up in a large bucket of dechlorinated water and let it sit for 24 hours. Some people like to add an air stone for proper aeration, but I did not have one. The final mix was a dark-looking concoction with a few floaty bits and quite a bit of that dry slow release fertilizer left over at the bottom; what I did was feed the tea to the Orange Hat Tomato–which was also enough for my entire garden–and then mixed the left over solids in with the soil as a side dressing. All of my plants absolutely loved it.

Lighting

Tomatoes, in general, are said to require 6-8+ hours of direct sun or light in order to produce fruit; the more sun that they get, the more fruit you will also get and the bigger and tastier they will be…so they say. Now, this is generally true and most plants, especially fruiting ones, thrive in environments where ample lighting is available because photosynthesis is the driving force behind the chemical processes that take place on a cellular level inside of your plants; however, if you’re wanting to garden and don’t get a lot of sunlight, do not feel discouraged. I will say, surprisingly, that these Micro Dwarf Tomato varieties, the Orange Hat included, will set quite a large amount of fruit even in poor lighting! 

So I obviously did not film this video outside; that would have introduced way too many other variables and would have made recording difficult. I chose a grow tent with an LED light as my filming station and got to growing! I talk about my setup in this post, in case you’re wanting to garden inside as well. I had the LED light on for 24 hours pre-germination and then followed an 18/6 light cycle post-germination, that is 18 hours of light and 6 hours of darkness which I had to trim off for every single day. There is some debate online as to whether to have your indoor plants on a 24 hour light cycle, but I’m a believer that plants do need to rest for a few hours, just like the rest of us; in fact, if you take a look at the video every time the day changes, the overnight time skip allows you to notice a bit of stretching and explosive growth happening. Plants will stretch to find light, and will even weaken and become “leggy” in poor lighting conditions.

MARS HYDRO 2×2 Grow Tent Kit for New Grower TS600 LED Grow Light Full Spectrum Indoor Grow Kit 24″x24″x55″ Hydroponics Grow Tent 1680D Canvas with 4” Ventilation System

$299.99


Growth Habit, Pruning, Pest & Disease

The Orange Hat Micro Dwarf Tomato (Solanum lycopersicum) sticks to the basic rules of how a tomato grows, besides its overall size and yield. It is technically considered a “Determinate” variety of tomato, which means it just gets to a determined height, sets its fruit, and generally dies off; however, as I describe below, this one likes to keep going for a while…

From what I’ve noticed, this variety of tomato will grow and extend normally via its main stem, and just like many plants and other tomato varieties, they will produce suckers between stem and leaf. Suckers will become new stems with more sun leaves, which will produce more suckers in between the two. Growing tomatoes is suckerception!

Flower structures will begin developing at the tip of each stem as they grow, so that means that the more suckers and flowers you have, the more tomatoes you will get; this is especially true of cherry tomatoes, so do NOT pick off the suckers unless you’re aiming to control the growth of your plant…which is totally unnecessary for this variety; cutting off suckers will surely cut into your yields.

The Orange Hat Tomato produced flowers for me by day 29 from seed, which I thought was extraordinary. This picture is them a few days after.

From the video and this image, you can tell that the leaves on this variety look quite unique, growing quite dense on the plant and they have almost like a swirl shape to them; I would say that this qualifies it as a potato-leaf type of tomato instead of a regular leaf, but correct me in the comments if you know for sure otherwise.

Saving seeds is also easy; being an open-pollinated variety, the seeds should come true to type when harvested and replanted. You can have as many of these tiny micro tomato plants as you want!

So, this tomato is tiny, not the tiniest in the world, but really tiny and I want to get into the differences of how it grew inside against the one I started for the garden outside. 

Depicted in this photo I took is the same container as in the video housing the same exact Orange Hat Tomato plant. I was done with shooting the content I wanted and decided to put the plant outside for it to do its thing on its own without even hardening it off–good LEDs make all the difference; these micro tomato plants are capable of living a rather long time (a year or more?) if properly taken care of and I was not about to find out how long…I just wanted to move onto the next video and the next variety of vegetable.

As you can see in the image, I’ve popped another two plants into the same pot. I was able to do this because the Orange Hat Tomato’s roots did not actually fill out the whole 5 gallon container. I scooped out the soil from beside the root ball and popped the other two in; I had these growing in other containers and decided to free those up for other plants. The root ball of the Orange Hat Micro Dwarf Tomato only took about 6-8 inches of space in diameter, meaning you can grow this variety in a much smaller container.

You can probably tell that the Orange Hat from the video is the darkest, shortest one on the top right. The plant on the top left is also another Orange Hat Tomato and that one grew outside the entire time. Lastly, and just FYI, the plant on the bottom left–or in the middle–is an Aztek Micro Dwarf Tomato, so I will not be talking about that one in this post, but it will perhaps get its own video in the future.

For comparison, The Orange Hat Tomato I grew outside is way lighter in color with a height of about 9 inches and the foliage spreads to 6 inches in diameter; it grew less fruit at once that took longer to ripen, but they were bigger in size. The plant in the video, however, is a really dark & rich green color, only got to 7 inches tall, and actually spread to 8.5-9 inches in diameter, with a lot of suckers, flowers, and fruit that also ripened quicker, but were otherwise smaller. Do note that both of these were fertilized in very much the same way. Between the two, the taste was also practically the same.

The difference in plant size was definitely because the one inside was receiving way more light energy, and also because I had my LEDs really close; I couldn’t move the light up because I hadn’t set up the pulley system correctly and I did not want to interrupt the grow just to fix it, so I stuck with it till the end. This caused some of the leaves to dry up a bit, but that just gave me an excuse to do one of my favorite garden tasks besides eating directly off the plant, and that is PRUNING.

Much like watering your tomatoes, I consider pruning them to be an art form; yes there’s a science and reason to it all, but once you grow your first tomato plant, if you even love tomatoes, you’ll suddenly become a mad tomato plant doctor with your own methodologies that you’ll use to prune to your liking as the need arises.

For this variety, we’re keeping it simple:

  • Prune off any old, diseased, dead or dying leaves; if they are fully brown or yellow in contrast with the rest of the plant, they are not photosynthesizing.
  • Do NOT remove young suckers.
  • Cut off any branch or part of a branch that is just done producing and growing. You can tell that a branch is done when it does not develop the next lead; just prune down to the previous sucker you see.
  • Cut off any flower structure that is fully done with its fruit.
  • Cut off any flower structure that you can tell didn’t get pollinated or won’t produce fruit.
  • If your plant is really old and drying up, harvest what it has and prune it all the way down, leaving just one or two green, fresh-looking suckers to become the next branch. You will have to determine if this is worth doing vs just starting another plant from seed.
  • Do NOT remove more than 2/3 of the plant’s total foliage unless it is diseased.

With careful pruning, you can keep the Orange Hat Micro Dwarf Tomato alive and producing for a very long time; give this variety a try and see how long you can keep it going for!

I did just bring up disease didn’t I, and pests can also be a huge problem in the garden. Well these little ones do get blight mainly because their foliage is so dense, but it doesn’t seem to spread faster than they can outgrow it; you do have to be careful though because blight CAN and WILL wipe out your entire crop if left unchecked, so be on top of pruning. These plants are tough though, as I’ve left these partially unattended while In contrastI’ve had to be diligent with my other variety of tomato plants outside. When the strong winds and rain carry blight spores through the air or manage to get it on my plants in some way or another, the leaves will brown and yellow.

The Orange Hat outside got a few leaf miners here and there, but barely anything else as far as bug damage. Tomato hornworms are also a big problem for your tomato plants as they will devour it in no time flat; their only job is to eat, poop, and carry on with their metamorphosis. I noticed a few of them on a Tidy Treats Tomato I have hanging upside down at the time of writing, but the Orange Hat Micro Dwarf Tomato has been Hornworm FREE the entire time.

Fruit & Taste

This is such a stunning variety to grow and worth it just for the looks of it, not to mention you get to snack in the garden and grow just a bit more nutritious food for you and your family in just a tiny space. Besides its compact size, the color of these tomatoes is what really drew me in; it is as they say, we eat with our eyes, and being one of my favorite colors, that vibrant orange just looks delicious. You’ll see my first harvest and a cross section in these next few images.

In the video, I kind of compacted a few days into a big one because a time lapse runs so fast; so you’ll see maybe two or three days worth of tomatoes being picked almost at once. I simply picked as I saw they had the right color day after day; they are rather firm otherwise, so hopefully I did harvest them at the right time. I just couldn’t help myself! Here’s the breakdown:

  • Harvest #1: 24 Tomatoes (97.7 g)
  • Harvest #2: 8 Tomatoes (36.5 g)
  • Harvest #3: 6 Tomatoes (24.4 g)
  • Harvest #4: 2 Tomatoes (6.4 g)
  • Harvest #5: 3 Tomatoes (4.7 g)

By day 83 I had tomatoes on my plate, from SEED. The plant outside did grow and ripen a lot slower, but you can’t help not getting enough sunlight at certain times of the year. The elements outside don’t help the situation either, but these have stood up to Mother Nature like a champ. Since I was babying the plant, none of my indoor tomatoes cracked, and the one outside has done just as well even in heavy rain. While they can crack, it doesn’t happen too often.

I end the video on day 117 with yet another round of tomatoes ready to harvest; that is unbelievable! Only a month later and it was still filling out with flowers.

As seen in the image of it outside, the Orange Hat Tomato is still thriving and giving me food. In fact, if I remember to update it, I will use this space below to keep track of how long I can keep it alive for.

Date Sown: September 26, 2021

Status: RIP June 28, 2022 – Produced a solid 3 times, a smaller 4th time, and died during the 5th growth of fruit due to heat and bugs after 9 months; I’m confident it could have gone longer under better conditions, though I recommend starting fresh from seed.

So, we got into how gorgeous these tomatoes are, but can they stand up to the palate? First and foremost, any tomato you grow yourself and let ripen properly will be more nutritious, have better texture, and be overall more delicious and flavorful than most store-bought tomatoes; people trash them, and while I agree, I have had really good ones from select specialties that some markets will bring sometimes. 

I’ve been giving some thought as how to describe the experience of a tomato, generally. Conveying a sensory experience can be difficult, so I’ll have to narrow it down to smell, skin or peel, inside texture, sweetness, acidity, tomato flavor, and seeds. Some of these might get a 1-5 rating along with some details.

The Orange Hat Micro Dwarf Tomatoes are pleasant in my opinion. I think that they make a great addition to a salad or just leave them on the counter and snack as you go. A healthy and decorative treat! Here’s my experience below:

  1. Smell: The smell of these tomatoes prior to cutting is, and I kid you not, kind of citrusy like a mandarin orange–then you cut them and they smell like tomato…which is great I love tomatoes! They get a 3 on the strength of the smell.
  2. Skin or Peel: These little tomatoes have a medium-tough skin I would say, which on a scale of 1-5, I’d give them a 3.5. When you bite into the tomato, it kind of bursts and you could end up eating the peel last because it separates. The skin actually has like a grape-kiwi skin kind of taste to it; I’m not complaining.
  3. Inside Texture: These tomatoes are reminiscent of eating a grape; not in flavor, but you can chew these like a grape. They’re not mealy at all, kind of juicy actually and meaty at the same time.
  4. Sweetness: I actually got an inexpensive Brix meter for this part, so I don’t know if it lies to me a little, but these gave me a Brix reading of 8% which I think it’s considered good? Well, they did not feel particularly sweet to me or rather, I’ve had sweeter tomatoes. They did have their sweetness and somehow the second harvest was noticeably sweeter, but on a scale of 1-5, I’d give sweetness a 2 for this specific grow. Did I water correctly? Should I have stressed out the plant a bit more? Maybe more Potassium? The flavor did not feel diluted to me at all though. So many questions and I cannot wait to experiment in the garden to find the answers!
  5. Acidity: This was probably the predominating trait of these tomatoes in this specific grow. Biting into these tomatoes, I instantly got a burst of acidity. I love acidic fruit, but I was expecting a bit more sweetness out of an orange tomato. I would give these a 4 on acidity.
  6. Tomato Flavor: The reason I think I did not overwater the plant is because these had a really strong tomato flavor for such a little thing. It’s like a kick to the palate, then it gets a bit mild and the tomato flavor lingers behind for a while. I would give these a 3.5 on tomato flavor. They did not have any miscellaneous hints of anything else but tomato.
  7. Seeds: This one is a bit difficult for me because eating tomato seeds doesn’t bother me as much as it does other people, as far as I’ve noticed. These have a good amount of seeds in them for such a tiny tomato. They get a 3 on a scale of seed quantity.

Wrap-up

Overall, I think the Orange Hat Micro Dwarf Tomato makes a great addition to anyone’s garden, especially if you don’t have a lot of space. You can grow these in a small container, and even interplant them between other crops or your larger tomato varieties. Not only are they beautiful and will add a touch of yummy interest to your garden décor, but these little plants can produce just a bit more delicious and nutritious food for you and the rest of your family.

I have created a page where I keep track of the tomato varieties I have tried here with y’all on my website and on YouTube plus the rest of social media. I will be ranking them according to how happy they make my taste buds and selecting which ones I will be growing in my garden year after year.

 >> My Favorite Tomato Varieties <<

Thank you so much for reading on! Always remember to like, share, and subscribe to our content and social media for your amazing and much appreciated support. I would love to get more people excited about gardening and growing their own food because it’s absolutely worth it!

Well, till next time!

No Comments

Leave a Reply

HomeShopWishlistAccount
Search
error: Protected