It’s Not an Alien, It’s a Brassica! Purple Vienna Kohlrabi + Time Lapse

Hi everyone, Oscar again with yet another time lapse video! Today, I want to introduce to you this really bizarre-looking  vegetable (in my opinion), kohlrabi! Specifically, I will be covering the variety Purple Vienna Kohlrabi. I was really intrigued by this vegetable just from seeing some of the pictures and videos online, and it was a first for me I’ll have to admit. I consider myself a relatively new gardener who started with some basic know-how from germinating beans as a kid in a paper towel, to building my knowledge and approach through real trial and error and by learning vicariously from some of my favorite YouTubers and plant enthusiasts online; also, I love food and browsing seed catalogs…and I had NEVER seen or heard of kohlrabi before. Of course, I HAD to try it.

I found my experience with this variety to be enjoyable and care-free; it just needed its food and water and it just did its thing. I’ve recorded this video as a time-lapse up on YouTube with a few tips along the way…I hope you enjoy! Do read on further for more detailed information on what I’ve done throughout the video and if you enjoy my content, make sure you subscribe to my newsletter, social media, and to the FateWorks Farms YouTube channel for your support!

Seeds & Germination

For this video, I chose to get my Purple Vienna Kohlrabi seeds from Zellajake Farm and Garden over at their Etsy shop, though you can go to their website over at zellajakefarmandgarden.comAside from the Purple Vienna Kohlrabi, they offer other varieties of seeds, so check them out!

You can see from this image that the seeds are round/oval in shape, and their colors range from a dark brown to a deep terra-cotta.

FateWorks Farms - Purple Vienna Kohlrabi Seeds

I’ve had good experiences with the seed quality from Zellajake Farm and Garden, so I went with them and also ended up getting a few other vegetable varieties that I’ll review down the line, so stay tuned!

The single seed I sowed for this run germinated on Day 2! I did not grow this one outside because I had no more space for it, but I got to grow it for this video, learn from it, and then eat it! I love it. You can read more on how this tastes down below. 

When sowing these seeds, just make sure your soil remains moistened, not drenched while it germinates and thereafter. If your soil is dry as your seed tries to come up, it will not survive. Luckily, these seeds germinate rather quickly, so you can resow and try again if it doesn’t go well the first time. Taking into consideration the varying quality of seeds that one might find out there, I would give these 5-14 days to come up, and possibly less for fresh seeds.

Soil & Container

I decided to start with fresh, organic potting mix for this run instead of mixing up my own like I did on my last video of the Orange Hat Micro Dwarf Tomato. You can usually find potting mix at your local nursery, so I went with some fluffy, well-draining Kellogg Garden Organic potting mix that I source at The Home Depot. I’ve had success using this mix as-is in the garden and in containers of all kind, but for this grow, I decided to amend the soil with Espoma Organic Bio-tone Starter Plus 4-3-3 granular fertilizer. This was my first time using this product, and having applied it also to the garden outside, I can say I’d use it again in conjunction to what I already use.

Espoma Organic Bio-Tone Starter Plus 4-3-3 Natural & Organic Starter Plant Food with Both Endo & Ecto Mycorrhizae; 4 lb. Bag; The Ultimate Starter Plant Food

$19.99


I skipped a crucial step when preparing my soil for indoor use, and that is to pour boiling water over the mix in order to kill off any eggs or bugs that may be hiding in there. This led to unwanted critters going about the place. You can read how I took care of them below! You want to do this before amending your soil with your granular fertilizer, especially if you are using an organic product that contains live beneficial bacteria. After letting it cool down or cooling it off with cold water, you can amend and continue with the following steps.

After mixing well, I created a small pocket in the center of my container and then topped it off with just plain coco coir, filling the pocket and then adding about an inch over the entire mix. The pocket and one inch layer help to make a good environment for the seed; this isn’t necessary, but seedlings don’t need any nutrition in the beginning stages of their life because the seed contains enough energy to guide it up to its first true leaves. I would much prefer that the seed germinate in as sterile and neutral of an environment as possible–because seeds CAN rot–and then the seedling will work to find water and the nutrients below on its own. 

If you aren’t familiar with coco coir, it usually comes in bricks that are made out of dehydrated coconut husks, compressed prior to shipping. Just add water and they expand into a fluffy, versatile mix!

Burpee Organic Coconut Coir Concentrated Seed Starting Mix, 16 Quart

$12.99


If you read my previous time lapse post, you might remember that I mentioned how much I loved fabric containers. Yet again, I chose a 5-gallon fabric container for this run. You can shop around and find these on eBay or Amazon, but here’s an example of what I’m talking about. Just make sure that whatever you get has handles! It will make your life so much easier. Although its roots took up the entire span of the fabric pot, I felt that a 5-gallon container was enough to grow a single kohlrabi plant. You could certainly go bigger, but I would not recommend growing it in a much smaller container.

VIVOSUN 5-Pack 5 Gallon Grow Bags Heavy Duty 300G Thickened Nonwoven Plant Fabric Pots with Handles

$16.99


Watering & Fertilizing

My approach to watering during this grow was rather simple; I knew that I was growing this Purple Vienna Kohlrabi for its bulb, and I also knew that the leaves were edible. In order to get a nicely-sized non-woody bulb and at least decent-tasting leaves, I was going to have to keep this plant happy…enough.

Post-germination, my main thought process on watering revolved around the size of the kohlrabi plant and its roots. Generally, roots don’t like to sit in unmoving unoxygenated water and soggy soil; while some plants tolerate this more than others, this is the perfect breeding environment for anaerobic bacteria, root rot, and the death of most plants. 

With that in mind, I made sure to water deeply and evenly enough only when the soil dried up to a point towards the beginning; I did not want to give it more than its tiny root system could drink up, but still wanted the growing roots to be able to access the entire span of the container without spreading into a dry area. As my kohlrabi grew, I quickly noticed how fast it would take up the water I was giving it; its root system was filling up its environment, so I had no choice but to gradually increase the amount of water and how often without overdoing it. Root rot aside, overwatering kohlrabi has the effect of cracking the stem and bulb. Although I believe this happened at the bottom during this grow, it did not have any noticeable effect on the plant and bulb itself.

Aside from the seasonal granular fertilizer mix that I use in my garden, I typically like to follow up every 7-14 days with a dilute water soluble fertilizer. I’m generally not too worried about the N-P-K ratios; I just pick something balanced and use what I’ve got on hand at the moment. Kohlrabi’s bulb grows above ground as the stem, so it is not considered a root crop; this means that it likes more nitrogen in the soil to support its bulb and broad leaves, but all I had on hand was AgroThrive Fruit & Flower Organic Liquid Fertilizer with a 3-3-5 NPK. They have another product better suited for the task, but again, just use what you already have and see how it works out! In this case, it was not a problem as this fertilizer is balanced enough to fulfill its purpose, even on non-fruiting plants. I’m not really taking into consideration the buildup of a particular nutrient in the soil when it isn’t being depleted enough and its long-term effects (especially in inorganic gardening); rotating your crops can help with this in the garden, but for a container with fresh soil, this wasn’t going to be an issue.

AgroThrive Fruit and Flower Organic Liquid Fertilizer – 3-3-5 NPK (ATFF1128) (1 Gal) for Fruits, Flowers, Vegetables, Greenhouses and Herbs

$31.97


In the video, all I did was use this fertilizer every 7-10 days by dividing the recommended concentration by 4 towards the beginning and then increasing it up to the recommended dose as the plant aged. I’m usually less careful with measuring with an older plant, but although this stuff is organic, anything in high concentrations can be detrimental if used incorrectly, so keep that in mind as you fertilize!

I should have given my Purple Vienna Kohlrabi a mid-way boost, but I ended up doing it towards the end. Instead of brewing my usual fertilizer tea, I had precious poop on my mind. That’s right, I said poop was precious, especially worm poop, or “worm castings.” This stuff is the byproduct or waste of the organic matter that worms eat, and it is AMAZING for your garden. Just take a look at the video and watch the roots go wild!

Brut Organic Worm Castings – 30 Lb – Garden’s Elixir for Thriving Blooms & Harvests!

$37.98


Lighting

Kohlrabi likes plenty of sunlight, so give it at least 6 hours of it or more if you can. If it receives less, it might just take a lot longer to harvest and the plant will not be as healthy. For this video, I gave it as much light as I could. I had my LED light on for 24 hours pre-germination to warm up the soil and to greet my seedling with a nice intense light. From then, it followed an 18/6 light cycle until harvest.

The one thing to keep in mind about lighting is that plants can receive too much light; moreover, if you’re growing outside or with high-intensity lights, you have to think about the amount of heat the plant is living in. Just like animals, plants can get sunburnt, and in the case of Kohlrabi, the heat will toughen and change the flavor of the leaves and produce a bulb that lacks the pleasantness and sweetness that it would otherwise. It is generally recommended growing this in cooler weather, but if you want to grow this at any other time of the year, throw it under some shade cloth or where it receives filtered lighting.

Growth Habit

Purple Vienna Kohlrabi is NOT an alien, it is officially known as Brassica oleracea var. gongylodes. First, it starts off like many Brassica seedlings, with foliar growth and a steady thickening of the stem for support. It then begins bulbing up the upper part of its stem while throwing out these massive leaves attached to the bulb by a thick stalk. The first notable signs of a bulb were seen around day 30, take or leave a few days, for this particular grow.

If you take a look at this image, you’ll see a nice purple veining on the leaves. The older leaves themselves are extremely broad, over-exceeding the span of my open hand (I can hit an octave on a piano easily); they are also quite thick and had a hydrophobic kind of quality to them. Water didn’t seem to stick like it does on other leaves, and rolls off in little droplets. 

In any case, I ended up harvesting my Purple Vienna Kohlrabi on day 66 from sowing my seed! Incredible…and so much food from just one plant.

Kohlrabi is a biennial, meaning it will flower on the second year and produce seed. Annuals and Biennials generally end their lifespan after going to seed, but something that’s “cool” about this vegetable that I’ve seen from Guten Yardening over on YouTube is that it will produce side-shoots with multiple edible bulbs afterwards! It makes me wonder if you can perennialize kohlrabi in certain climates and whether these new bulbs will seed on their first or second year…

Well, I don’t have any flowers to show you for this post. Plenty of biennial crops are grown as annuals, such as kohlrabi, but If I ever grow this variety to seed, I’ll make sure to update this entry and show you all!

Take a look at this harvest shot. The bulb ended up being about the size of a baseball with a bunch of stalks holding up some beautiful foliage; I absolutely love that purple and green combination with that odd alien-octopus tentacles look. Bottom, older leaves will dry up naturally, so it’s better to eat them before they do!

Pruning, Pest & Disease

Next on the list is pruning. Pruning is such an enjoyable part of gardening; it allows your plants to focus their energy on new growth, and it leaves your garden looking fresh, tidy, and like you’ve been on top of it every single day even though binge-watching your favorite show caused you to neglect it for a sec…

Pruning also has the added benefit of keeping down pests! Generally, the pests that go for our vegetables end up doing so because they are attracted to the decaying matter around them; they are decomposers. If you see a leaf or set of leaves on your plants that are yellowing and dying, they aren’t doing much work for it, so snip them off and throw them into your compost, where they will do more in feeding your soil life while helping keep pests away from your vegetables.

For this variety, we’re keeping it extra simple:

  • Prune off any old, diseased, dead or dying leaves; if they are fully brown or yellow in contrast with the rest of the plant, they are not photosynthesizing.
  • Defoliate and eat or compost older leaves before they dry up or get diseased.

For my indoor grow, I did not have to deal with the general pests and disease that one might find on a Brassica when gardening outside. Depending on your location and the time of year, kohlrabi can be plagued with snails, slugs, cutworms, cabbage worms, aphids, flea beetles, and any other Brassica-loving critter. It is also susceptible to downy and powdery mildew, mold, leafspot, etc. 

Indoors, I did not have to worry about disease, but I was plagued with other kinds of critters…As mentioned earlier in the Soil & Container section, I skipped the crucial step of using boiling water during prep in order to kill off any bugs and eggs that might be hiding in the soil. This led to the pesky problem of ants and fungus gnats in the grow-room. I tried concentrated peppermint essential oil and they laughed; all that did was burn one of the leaves that it landed on. They were getting out of control and I just had to do something about it, so this is what I used:

PyGanic Gardening 8oz, Botanical Insecticide Pyrethrin Concentrate for Organic Gardening

$29.36


If you aren’t familiar with fungus gnats, well they are annoying, surely; they look like tiny flies that like to hang around your plants in their safe haven. They are “harmless” to your plants in their adult stage, but an adult female will lay up to 300 eggs in your soil and their larvae will feed on your plant’s roots only to repeat the cycle. That’s a no no situation when I’m trying to eat, so I used a Pyrethrin based product, an organic, pet-friendly solution, to control them along with the ants in my grow room. 

Pyrethrins are a set of compounds that exist naturally in the chrysanthemum flower and together make up Pyrethrum, which works as a natural pesticide. Pyrethrum is a contact killer that is toxic to ALL insects bad or good, including bees, so I don’t personally use this in my garden. If you think you need to use it, however, you can do so by carefully following the instructions and applying it after the bees are done foraging. The good thing is that this does not persist in the soil or in/on your vegetables and degrades with sunlight in just a few hours; if you’re ever worried about ingesting what you put on your plants, just harvest what you need before using it and always wash your produce as a general rule! Since this grow is happening in an isolated grow tent with LEDs that house UV emitters, I decided to use it to control pest pressure in my grow room, and to good effect. Pyrethrum and Pyrethrins are not to be confused with Pyrethroids, which are synthesized compounds that mimic the effects of Pyrethrum.

Use & Taste

Before setting out on this journey of growing Purple Vienna Kohlrabi, I did do my research, because you always need to be responsible for understanding what you grow to consume. Some vegetables will have edible parts that are world-renowned for their health benefits, but consume the wrong section of the plant or prepare it in the wrong way and you could get yourself in some trouble…

Luckily, we can enjoy Purple Vienna Kohlrabi worry-free; if you are sensitive to this vegetable in some way, then I wouldn’t recommend growing it for yourself. I usually take an “eat a bit of everything good in moderation” approach to a diet; consuming too much of one thing, regardless of it being “healthy,” can have negative effects also.

Regardless, I will say that this healthy vegetable is quite versatile and gives a good amount of food per plant in such a short time! (…I forgot to weigh it, but it’s a lot!)

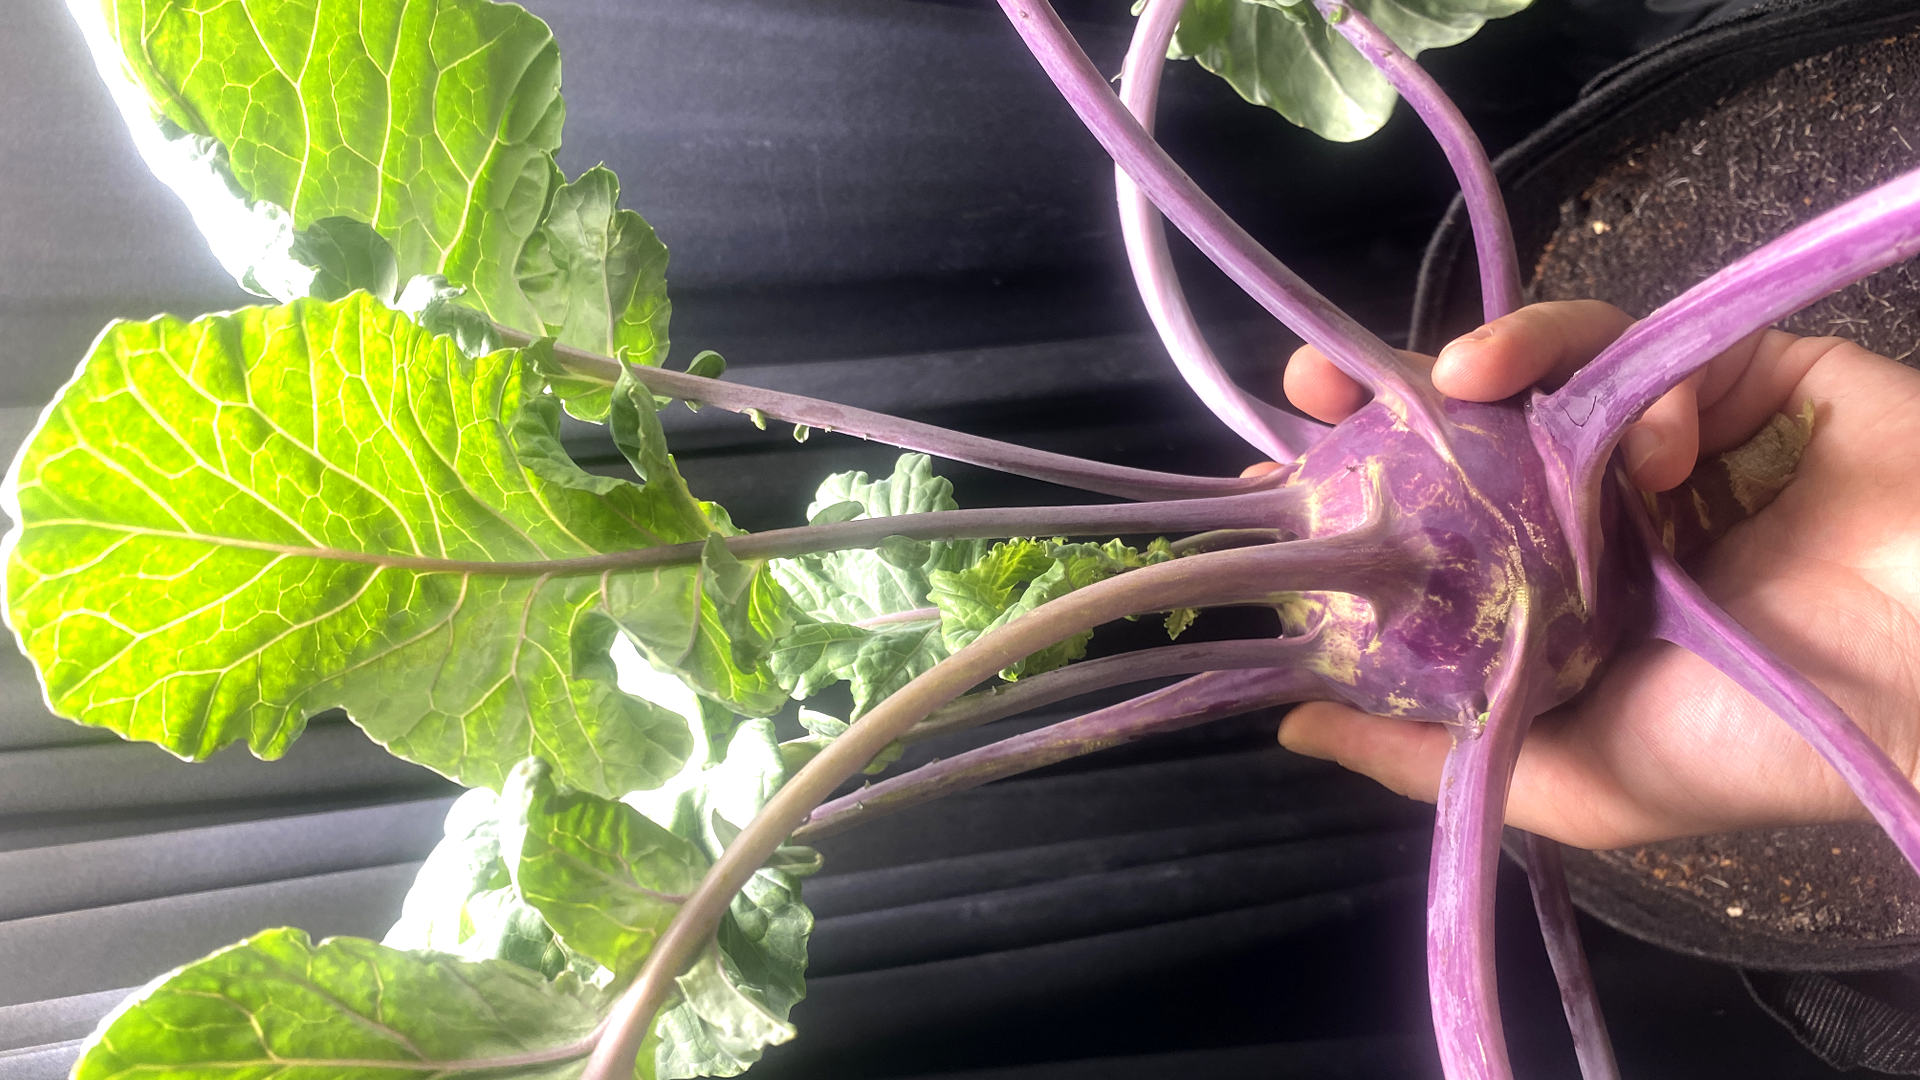
Kohlrabi is mostly grown for its bulb, which grows as a thickening of the stem; however, the entire vegetable is actually edible and can be eaten raw (not sure about the roots, though I think it should be fine…I wouldn’t eat the roots). In any case, Purple Vienna Kohlrabi is…purple…and it has these huge purple-veined leaves attached to the bulb by these gorgeous purple stalks. How many times have I written the word purple in this article? Ctrl+F to find out!

You can eat the leaves and the stalks at any point, though I find that the stalks get a lot tougher and woodier the older they get; these got thrown in the compost after swiftly OK-ing them and sliding my fingers outward to remove the greens for consumption. The younger stalks are easy enough to eat, and I find that the older greens are as well!

The last of it is the bulb, which you need to peel like a potato to reveal the hopefully-crisp-soft-and-crunchy inside if it has received enough water and is harvested on the younger side. By day 66 I had a whole lot of vegetable in my hands to do something with. Since it was my first time growing kohlrabi, the first thing I had to do was try it as-is.

The leaves were pleasant young or old. Note, the temperature in my grow tent was steady around 76 °F, not too cold and not too hot, and the plant received plenty of light. Although the older leaves were rather thick, they were not tough and had this underlying sweetness when eaten raw. Kohlrabi can survive light frosts, and I can imagine that the flavor gets sweeter and the texture improves as the cooler weather hits. The opposite could be said if it is grown under too much heat; the taste becomes more bitter and less sweet, the texture overall would be tougher, and the rest of the plant more woody. With that said, the greens from this grow were delicious, not bitter or grassy-tasting at all, and slightly sweet even when not grown in the cold! I had never had greens like that from the store, with those sweet notes towards the end. Belonging to the same species, the leaves are reminiscent of collards in texture–if you are familiar with those–and you can choose to prepare them in much the same way. These can also go into soups or mixed in raw with the rest of your salad greens.

I only really tried the younger, tender stalks and they’re pleasant enough chopped into my salad. The slightly older ones could still be eaten raw like celery, with a better taste than the latter. I’m not a huge fan of celery despite how widely loved it is for its health benefits; it is one of the only things that I find tastes overly grassy unless cooked into a soup or stew, so this could be a good substitute when eating it uncooked. The older stalks were inedible in my opinion. If you wanted to eat those, you could cook them down to nothingness and then attempt to pierce some of it with your teeth, because I didn’t even try. I took a single bite of the older stalks and it was like chewing into dry bamboo…to the compost with ya!

The bulb was rather delicious in my opinion. Peeling off the purple and inner green parts from the bulb revealed this really juicy-looking white interior which I diced entirely. Eating this raw, the texture was crunchy like an apple, but not as gritty and closer to what a radish or a raw potato would be like. The flavor was unlike the aforementioned; the first thing that came to mind was asparagus and then cauliflower and broccoli, all while being juicy and fresh.

So, what did I do with all of this kohlrabi? I chopped everything into small pieces and it would then go to feed my family and I at four different meals! It got eaten as a side in some dishes, and as an additive in others; some of it ended up getting tossed into a fresh salad, but because I love sautéed vegetables, most of this got cooked together with a bunch of other ingredients, depending on what we had that day. I also got to make myself a vegetable and egg omelette; I just gave the veggies a quick season & cook, threw them into some eggs, and had a really delicious and healthy lunch.

Wrap-up

It’s definitely a Brassica! Growing Purple Vienna Kohlrabi was a fun and delicious first-time experience and now I get to share it with you all! Unfortunately…or fortunately, you’ll have to grow this yourself to try it because I’ve already eaten mine! If you’re lucky, maybe you can even find it at a store near you; I sure have not. In any case, I really hope you give this variety a try just for its looks alone and I guarantee you’ll have a tasty addition to your meals in the end.

There are other varieties out there that I will be reviewing in the future for sure! I have created a page where I keep track of the kohlrabi varieties that I have tried here with everybody on my website and on YouTube plus the rest of social media; take a look at the link below:

 >> Kohlrabi Varieties I’ve Grown <<

Thanks for reading on and getting to the end! Remember to like, share, and subscribe to our content and social media for your amazing and much appreciated support. I hope you’re as excited as I am about growing your very own food for you and the rest of your family.

I’ll see you around!

No Comments

Leave a Reply

HomeShopWishlistAccount
Search
error: Protected